Author an email template
1. Open Comm. Templates → Add new template and pick Email template.
2. Give it a Name (internal) and a Subject (member-facing).
3. Build the body — either start from a ready-made design via Template gallery, or add a Section from the left block strip and drop content blocks (Title, Paragraph, Image, Button…) inside it.
4. Personalise with Insert merge tag, and add trackable links via Select magic links.
5. Send test email to yourself (needs Name + Subject), then Save.
The template is now Active and pickable from any Send email action. Email is a paid service — campaigns using it surface a charges note.
An email template is a saved, named message you build block by block on a visual canvas. Subject, body, sender identity, and styling all live in the template; campaigns that send the email reference it by name and don't carry any of those choices themselves.
Walkthrough
Open Comm. Templates in the left nav, click Add new template, and pick Email template as the kind.
Name and Subject
- Name — internal label only. Members don't see it. As with SMS templates, prefer something specific (
Happy Hour — launch announcement,Birthday — happy birthday email) over generic. - Subject — the email subject line, member-facing. This is locked at the template level — campaigns that reference the template cannot override the subject from the campaign side. If two campaigns need different subject lines but the same body, build two templates.
Start from the Template gallery
You don't have to build from an empty canvas. Click Template gallery in the top toolbar to browse ready-made email designs and load one onto your canvas.
The gallery is grouped into two families:
- Campaigns · Marketing — one-off sends you plan and schedule yourself: a bundle deal, a new menu launch, a happy hour, a points multiplier, and so on.
- Automation · Personal — messages that fire per member off a trigger: welcome, birthday, win-back, punch card nudge.
Each card carries a short description of what the design does, a set of tags, and a live preview of the email itself. The tags are the useful part — they tell you the campaign type, the visual register (playful and colour-blocked, dark and editorial, photo-forward…), the call to action the design is built around, and the kind of business it was drawn for.
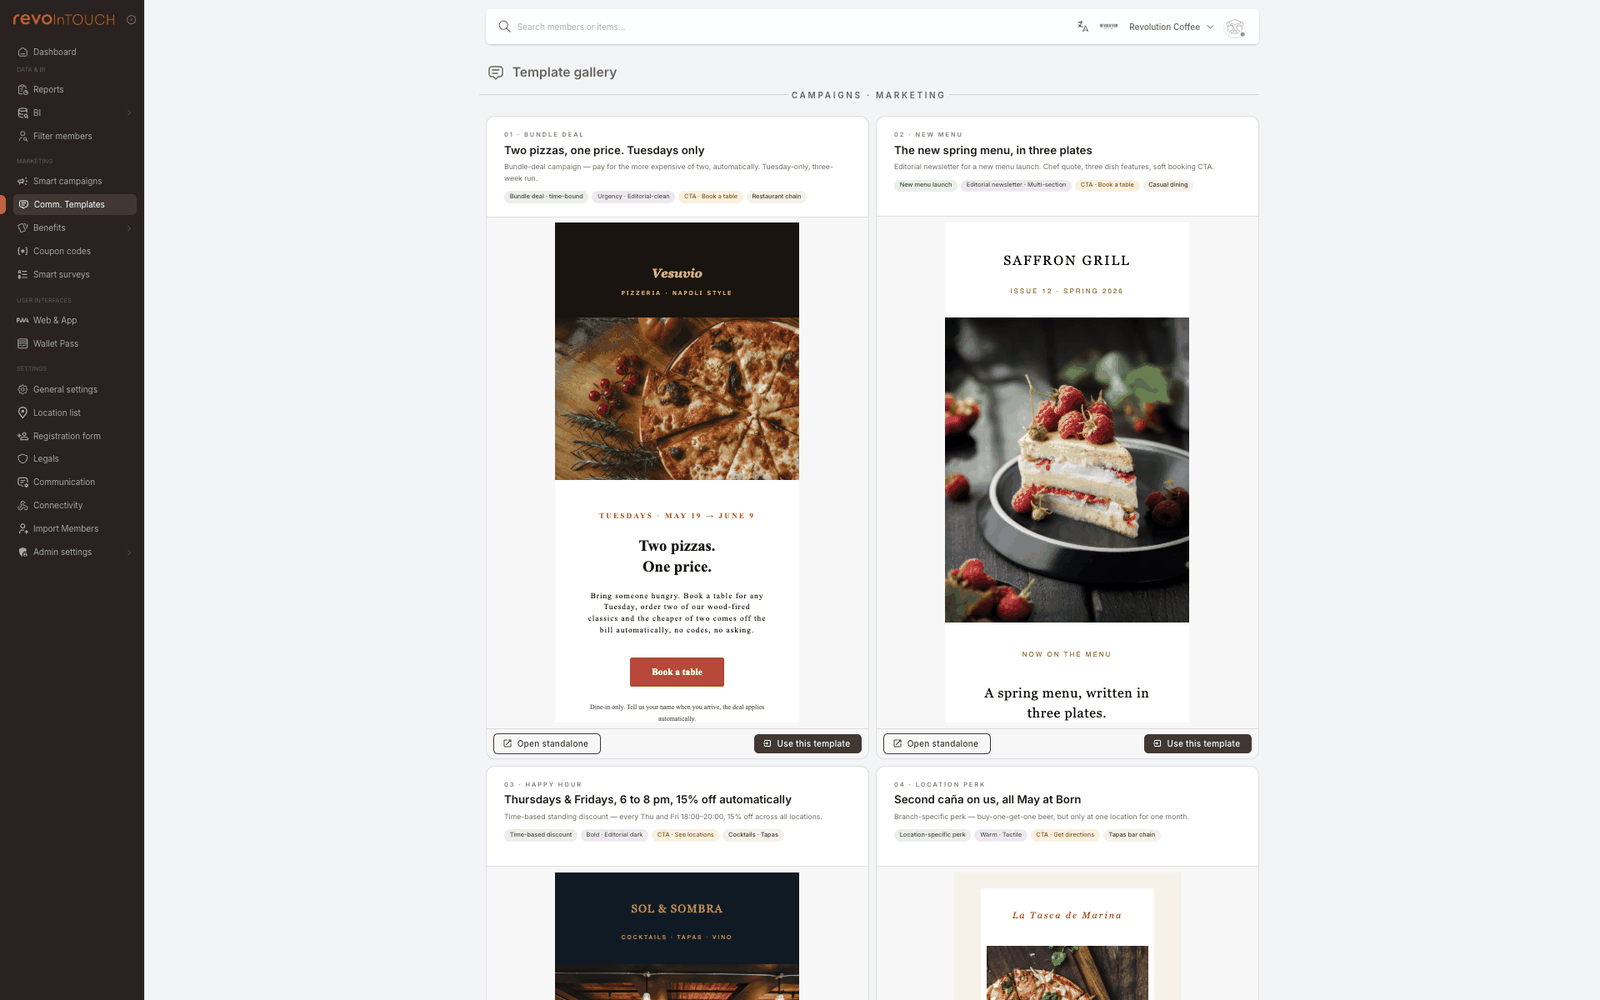
Two buttons sit under every card:
- Open standalone opens the design full size in a new browser tab, so you can read it properly before committing to it.
- Use this template loads the design onto your canvas as a new draft. Name and Subject stay empty — they're yours to fill. Nothing is saved until you click Save.
The business type on a card ("Coffee chain", "Fine dining") describes the example, not a restriction. A photo-forward welcome email works just as well for a gym once you swap the images and copy. Choose the design whose tone matches what you want to say.
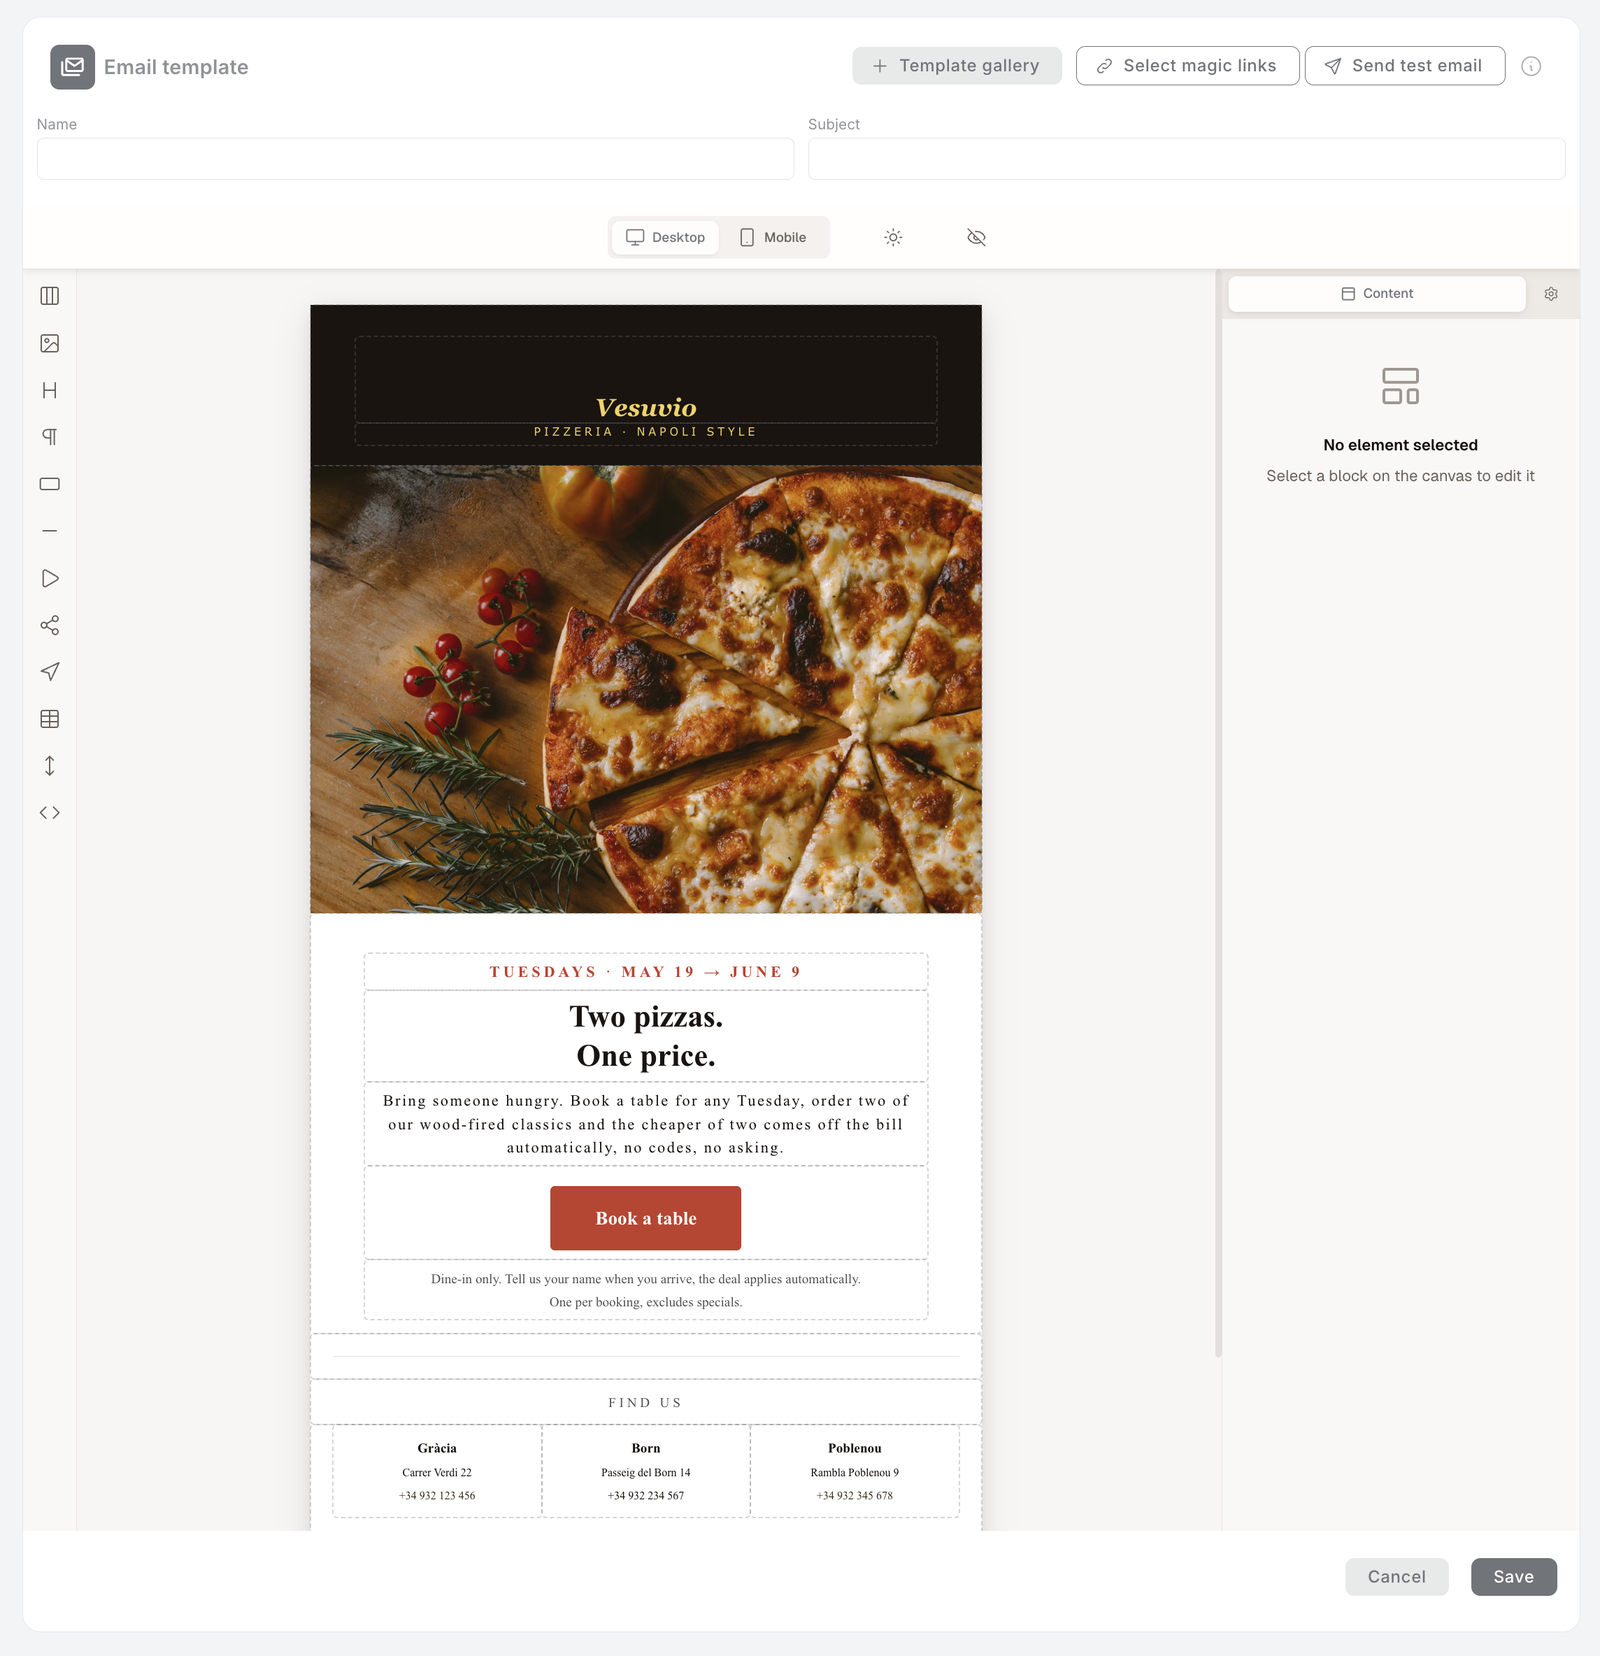
The editor at a glance
The body is built on a visual canvas with three working areas around it:
- Top toolbar — Template gallery, Select magic links, Send test email, the Name and Subject fields, a Desktop / Mobile preview toggle, a dark-mode preview (sun icon), and a preview toggle (eye icon) that hides the editing controls.
- Left block strip — the content blocks you add to the canvas: Section, Image, Title, Paragraph, Button, Divider, Video, Social, Menu, Table, Spacer, and a raw HTML block.
- Right properties panel — appears when you select a block, with two tabs, Content and Settings. With nothing selected it reads "No element selected."
Adding and arranging blocks
Click a block in the left strip to add it to the canvas. Start with a Section — it's the container that holds your content in columns, and it's where everything else should live.
Select any block on the canvas to get its inline actions: a drag handle to reorder, Duplicate, and Delete.
A block dropped straight onto the canvas, outside a Section, may not render when the email actually sends. Add a Section first, then nest your Title, Paragraph, Image and Button blocks inside it.
Editing a block
Select a block and edit it in the right panel. The fields deliberately use everyday words, not design jargon — so you work in your own language ("make the button red," "link it to the menu," "hide this on mobile"):
- Content holds the block's main properties — for a Button, that's its Text (the label), URL (where it links), Background and Text Color, Border Radius (corner roundness), and Padding (inside spacing). Other blocks expose the handful of properties that make sense for them (alignment, width, font, and so on).
- Settings holds the secondary options.
- Almost every block can be shown or hidden per device with Show on desktop / Show on mobile.
Adding images
Use an Image block. Either paste an Image URL (no upload needed), or click Browse Media to pick from the asset library — where you can also Upload new images. Then set Alt Text, Width, Align, and an optional Link.
Older images in the library may show code-like file names instead of readable ones — that's expected for legacy uploads; pick by thumbnail.
Personalising with merge tags
Dynamic fields work the same way as in SMS — they resolve per-recipient at send time. Insert merge tag controls sit beside text and link fields (and appear inline while you're editing text). They drop in member details — first name, balance, and the like — grouped by Member, Business, and Event. As with SMS, write copy that reads cleanly even when a field is empty, or filter the audience to members who have it.
Adding trackable links (magic links)
Click Select magic links (top right) to insert a tracked URL that carries a per-member key. Four kinds are available — Survey links, Coupon codes, Wallet Pass links, and the Unsubscribe link. Copy the link you want and paste it where you'd like it to land — for the unsubscribe entry, select the text members should click, add a link to it, and paste the copied URL. This is especially useful in email, the surface most often used for surveys, coupon redemptions, and rich CTAs that benefit from attribution. The full picker is documented in Templates overview → Magic links.
Sender identity
The sender name and address shown in the member's inbox are configured at the tenant level, not per-template. They live under Settings → Communication, and every email template that sends through the tenant inherits them. There's no per-campaign or per-template override — change the sender in one place and every email send updates.
If you need to send from multiple identities (e.g. transactional vs marketing), that's a tenant-level configuration question, not something the template can control.
Preview and send a test
Above the canvas, switch Desktop / Mobile to check both widths, use the dark-mode preview to see how it renders in dark inboxes, and the preview toggle (eye) to view the email without editing controls.
Send test email sends the current design to your own address and shows a "Test email sent successfully!" confirmation. It needs the Name and Subject filled first. Tip: build inside a Section, or the test can arrive empty.
Save
Click Save in the bottom right. The template lands in the list view as Active and is immediately pickable from any Send email action.
Variations
4 common patterns — multi-language, plain-text, member-segment versions, A/B subject
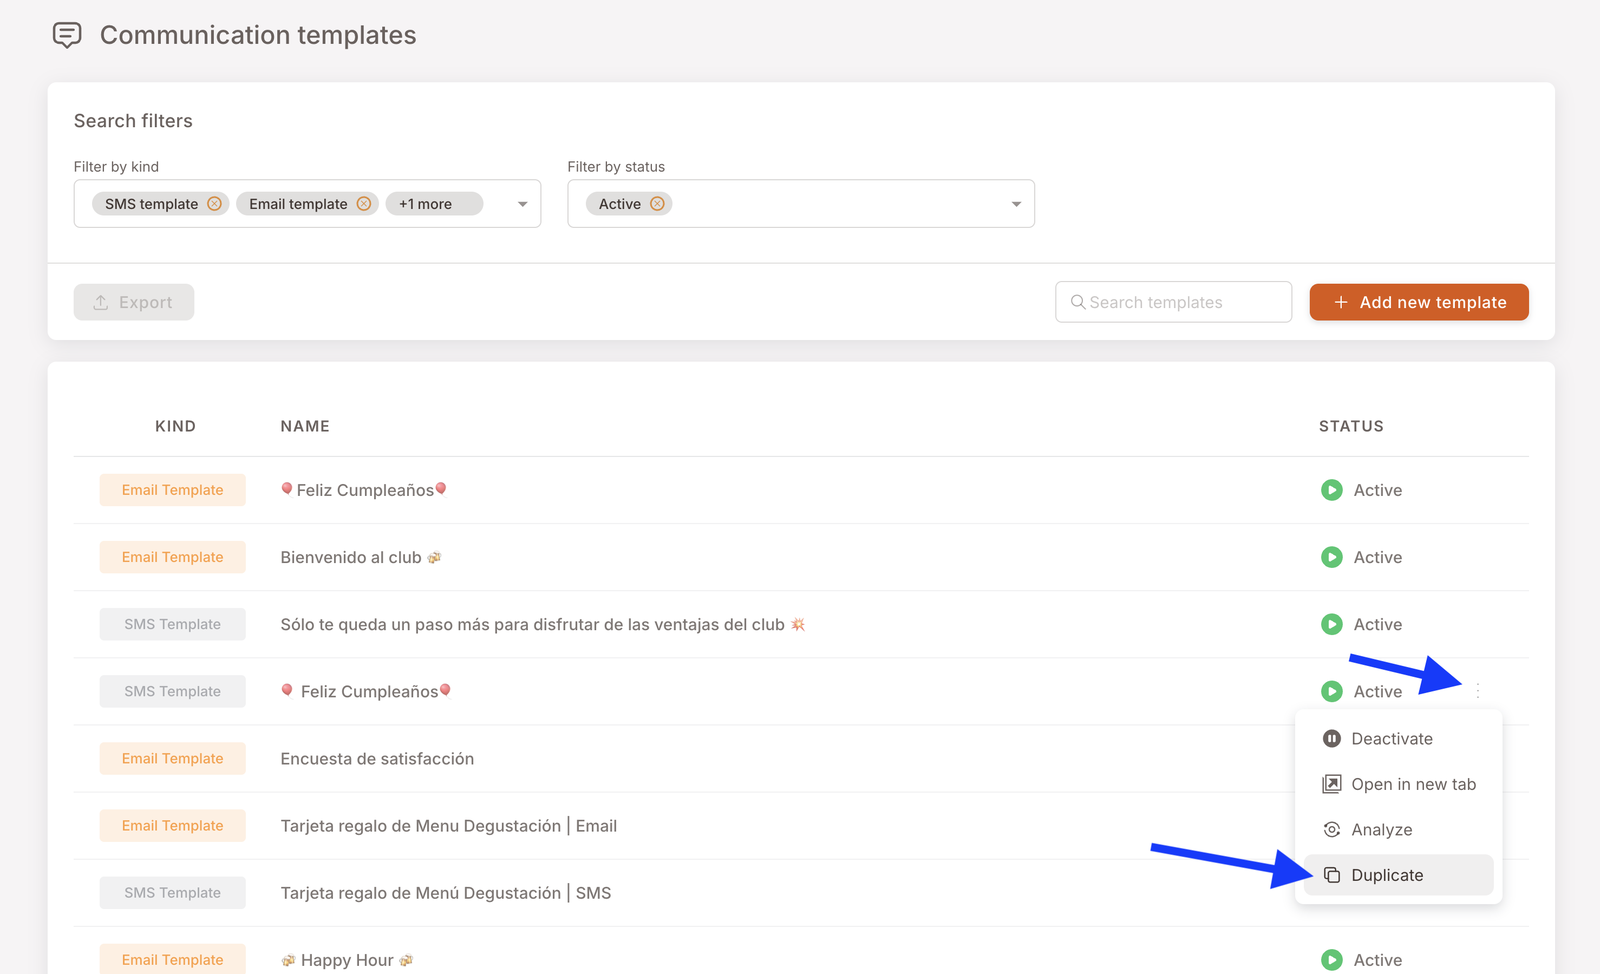
Per-language templates via Duplicate. Build the master template once, then from the Comm. Templates list view open the row's three-dot menu and pick Duplicate. Rename the copy (Happy Hour — ES, Happy Hour — EN) and translate the body — no need to rebuild the layout. Route members to the right template via Split into several cases on the campaign, conditioned on the Preferred language member attribute. Duplicate is the general pattern for building a library of business-specific starters from any existing template.
Stripped-down "plain" template. For transactional sends — receipts, password resets, account confirmations — keep the canvas to plain Title + Paragraph blocks with no images. Higher deliverability, fewer spam-filter triggers.
Per-segment templates. Build one VIP-flavoured template (different copy, different artwork) alongside the standard one and use case-conditioning on the campaign to route VIP members to the VIP template.
A/B subject lines. Subjects are locked at the template level, so A/B testing the subject line means building two templates with different subjects (and possibly identical bodies) and routing half the audience to each via two parallel campaigns or a Split into several cases.
Gotchas
6 things that commonly trip people up
- A gallery template is a copy, not a link. Once loaded, it's yours — editing it never touches the gallery, and later gallery changes never reach a template you already built. Go through every line of copy, every image, and every button URL before you send: the design ships with example content.
- Build inside a Section. A block placed straight on the canvas, outside a Section, may not render when the email sends — and a test send can still report success. Always nest content in a Section.
- Email is a paid service. Campaigns that include a Send email action surface a charges note in the wizard. Sending to a large audience is an operational cost decision, not just a marketing one — clear it with whoever owns email billing on your team before scheduling a tenant-wide send.
- Subject is locked at the template level. A campaign cannot override the subject from the campaign side. If you need different subjects for the same body, you need separate templates.
- Templates are referenced, not snapshotted. Editing a saved template changes what every campaign using it sends on its next firing. Lock template edits once a campaign is scheduled and close to firing.
- Merge tags render empty if the member's data is missing. Same caveat as SMS — a member with no first name on file sees an awkward greeting. Write copy that degrades gracefully, or filter the audience to members with the field populated.
Good to know
A few small things about the editor
- Undo with Ctrl / ⌘ + Z — there are no on-screen Undo / Redo buttons.
- Device preview is Desktop and Mobile only — there's no separate Tablet view.
- Keep designs block-simple. The blocks cover the common email patterns; very fine design flourishes aren't available, and simpler emails tend to deliver better anyway.